
This post contains affiliate links.

Just after my 2nd birthday, Mommy made this awesome sandbox (a roasting pan full of sand) for me. I thought it was great, but Daddy thought it needed an upgrade, so......

We picked a corner of the yard that already had a shade structure in place and leveled out the ground (don't mind our dead grass...2011 drought)

Daddy talked Mama in to "going big or going home" -which I'm so grateful for. The resulting 6ftx6ft sandbox is sturdy enough to last a lifetime and big enough to hold the big kids (mom and dad). We used 2x8x6s for the 4 side walls.

Daddy predrilled all the hole for assembly with lagbolts and 4x4's in each corner. I put all the washers on the bolts for Daddy.

This is what it looked like as a dry-fit. But, Daddy took it all apart again so we could paint each piece separately. ( I was measuring it just to see if it was square...by the way, it measured: "26 3-quarter inch half big" - in case you were curious)

We used Thompson's Water Seal Deck & House Waterproofing Stain. We thought this stuff was pretty awesome! Mommy said it went on smoother than a stain and protects everything from water damage (and she was right - the sandbox has survived 4 seasons of Texas storms and still looks beautiful!).

Many hands make light work, so I grabbed a roller and started painting.

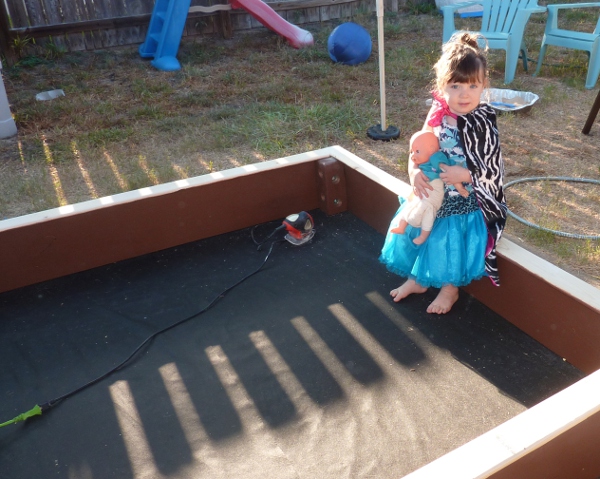
After the paint dried, we reassembled the whole thing and flipped it upside down. Mommy and I used black weedblock fabric (almost a whole roll) and stapled it to the edges with a staple gun. We did an overlapping layer going one direction, than a second layer going the other direction...then one more going the orginal direction. Take that, weeds!!!

After weed-proofing the bottom, we flipped it back over to add 1x3" trim around the outside edge (a comfy place to sit while putting your feet in the sand). We used a Daddy's router on all the edges for bullnosed smooth overhangs and mitered the four corners (Mommy did that - I covered my ears).
Then we realized we forgot to paint the trim pieces before we attached them. No worries....a coat of paint and we moved on.


After dumping 20 bags, the sandbox was about 6 inches deep. We decided that was enough for now.

A lot more room to play than roasting pan, huh?

With lots of room for friends!
Update from Mommy:
I sewed a sandbox cover out of left over awning fabric (to keep the cats out). It was an experiment in math for me trying to get a good fit as the fabric had no give to it. I later thought of a few improvements to the design that could have worked out:
1. I could have taken a vinyl table cloth and just added elastic sheet straps to the corners to keep it in place.
2. Building the sandbox as a rectangle rather than a square - we could have used a fitted sheet to cover it- the elastic corners would fit snuggly over the trim and stay in place even in high wind.

3. Cutting the center out of the fabric cover and sewing a mesh (tulle) insert to allow for drainage and sunlight (so water doesn't collect and grow algea). We DID do this after a few weeks of rain collection.
We also added mulch and pavers around the sandbox to keep the grass from growing right up against it. The sand that is kicked out during play mingles with the mulch nicely and never looks messy.
1. I could have taken a vinyl table cloth and just added elastic sheet straps to the corners to keep it in place.
2. Building the sandbox as a rectangle rather than a square - we could have used a fitted sheet to cover it- the elastic corners would fit snuggly over the trim and stay in place even in high wind.
3. Cutting the center out of the fabric cover and sewing a mesh (tulle) insert to allow for drainage and sunlight (so water doesn't collect and grow algea). We DID do this after a few weeks of rain collection.
We also added mulch and pavers around the sandbox to keep the grass from growing right up against it. The sand that is kicked out during play mingles with the mulch nicely and never looks messy.

It is always a blessing to our family to be able to work on a project together. We continue to enjoy this one season after season. I hope you are inspired to start a family project - don't forget to include the kids -even 2 year olds!
No comments:
Post a Comment